> ## Documentation Index
> Fetch the complete documentation index at: https://docs.qontext.ai/llms.txt
> Use this file to discover all available pages before exploring further.
# Gemini
> Connect Qontext to Gemini via the Agent Development Kit for enterprise context in Google Cloud
Implementing an enterprise-grade connection between **Qontext** and **Gemini** using the **Agent Development Kit (ADK)** lets you provide LLMs with proprietary company context while keeping access secure and permissioned. This guide walks through the integration for Google Cloud: **Secret Manager** for credentials and **ADK Session State** for conversational memory.
## Prerequisites
* A [Qontext](https://app.qontext.ai) account with ingested data
* Access to [Gemini Enterprise](https://console.cloud.google.com/gemini-enterprise) in your Google Cloud project
***
## Installation
### Step 1: Infrastructure and security setup
Set up your Google Cloud project and secure credentials before writing agent code.
Open the [Google Cloud Console](https://console.cloud.google.com/) and create a new project or select an existing one from the project picker in the top bar.
 In the left navigation go to **APIs & Services → Enabled APIs & services**, then enable:
* Vertex AI API
* Secret Manager API
* Discovery Engine API
* Generative Language API
* Gemini for Google Cloud API
* Cloud Resource Manager API
If you don’t already have one, [create an app in your project](https://console.cloud.google.com/gen-app-builder/engines).
Store your Qontext API key in Secret Manager so the agent can read them at runtime. Choose either the UI or the CLI.
1. In the left navigation, open **Security → Secret Manager**.
In the left navigation go to **APIs & Services → Enabled APIs & services**, then enable:
* Vertex AI API
* Secret Manager API
* Discovery Engine API
* Generative Language API
* Gemini for Google Cloud API
* Cloud Resource Manager API
If you don’t already have one, [create an app in your project](https://console.cloud.google.com/gen-app-builder/engines).
Store your Qontext API key in Secret Manager so the agent can read them at runtime. Choose either the UI or the CLI.
1. In the left navigation, open **Security → Secret Manager**.
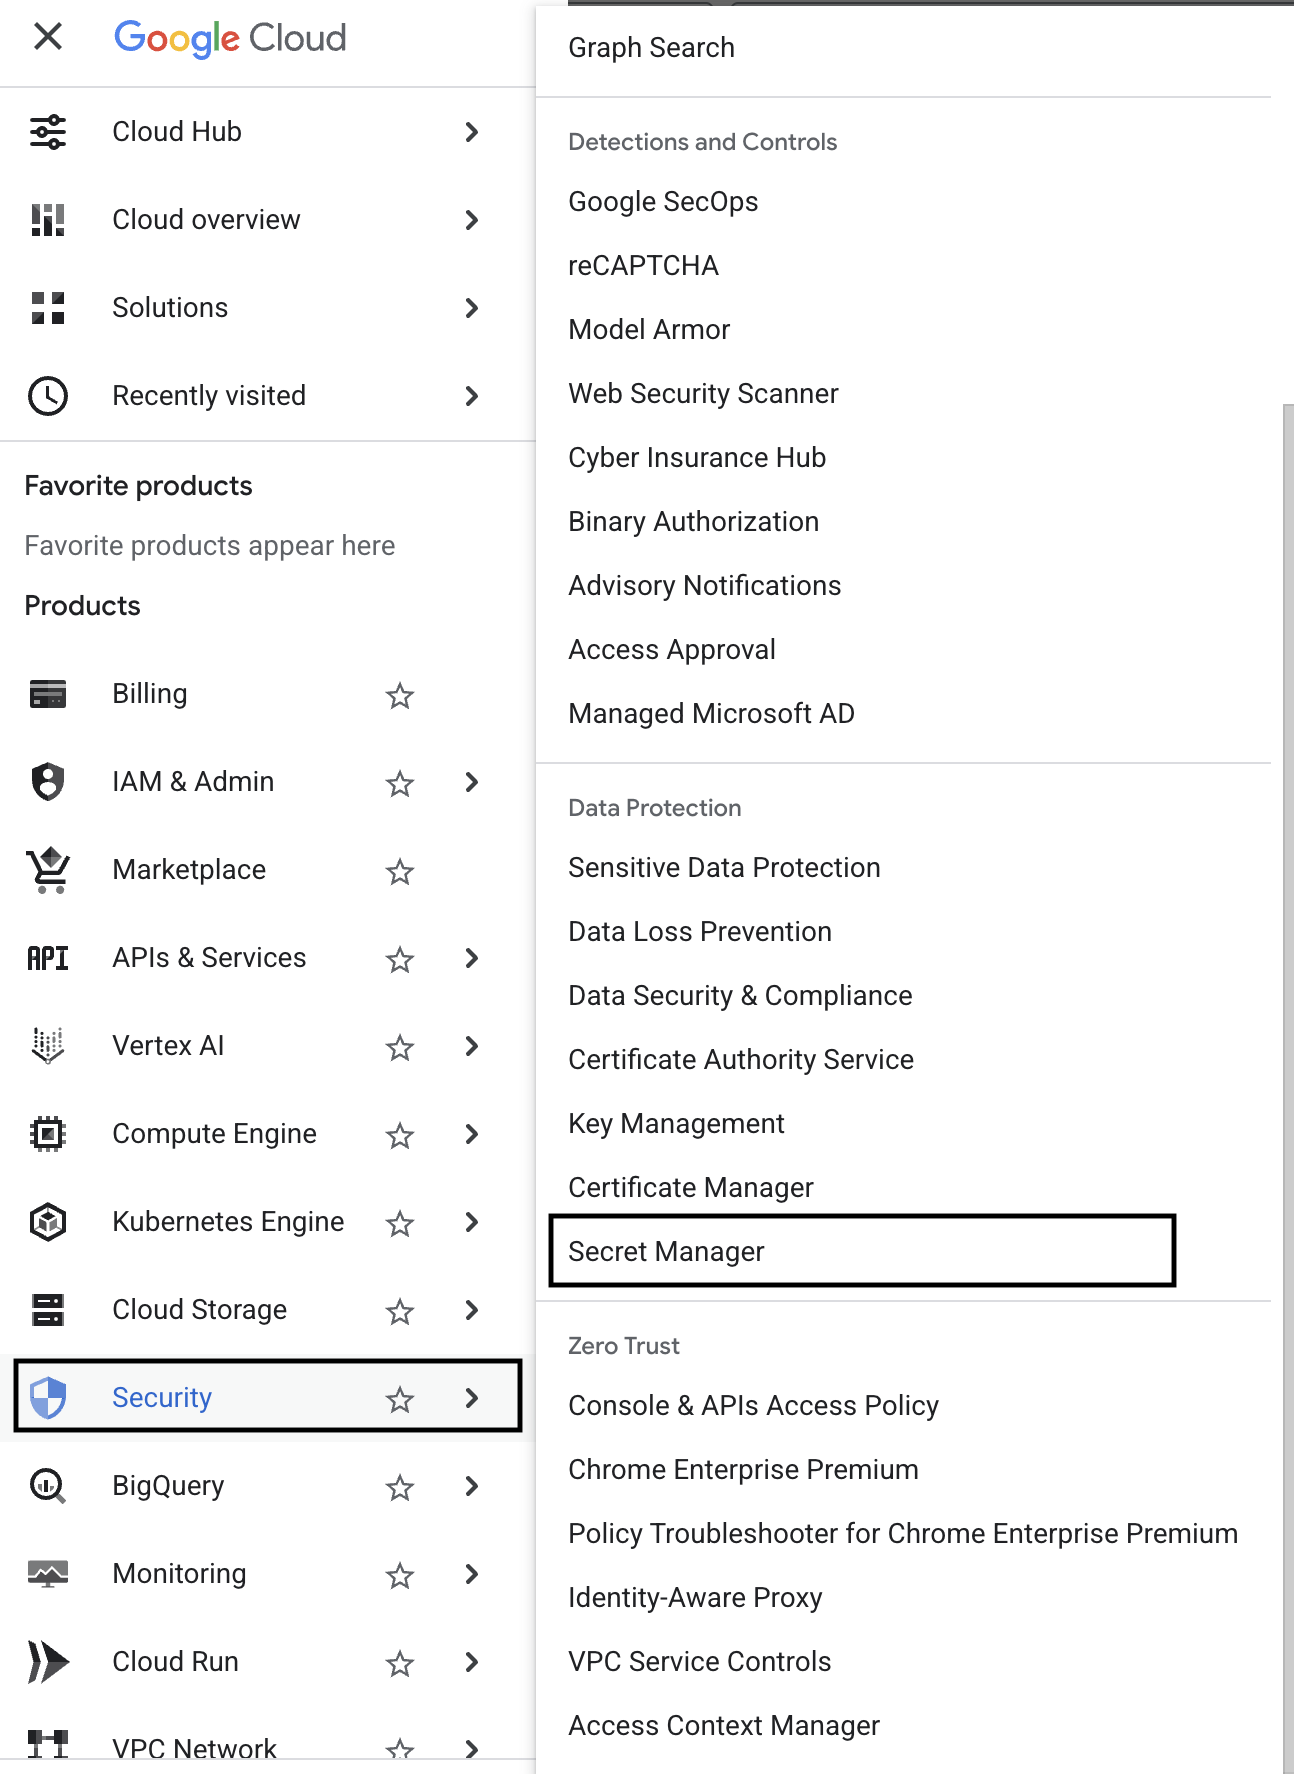 2. Click **Create secret** for each of the following:
* **Name:** `QONTEXT_API_KEY_SECRET` — value: your Qontext API key
* **Name:** `QONTEXT_VAULT_ID_SECRET` — value: your vault ID
3. Grant the agent’s service account access to these secrets:
* Go to **IAM & Admin → IAM**.
* Enable **Include Google-provided role grants** (checkbox at top right).
2. Click **Create secret** for each of the following:
* **Name:** `QONTEXT_API_KEY_SECRET` — value: your Qontext API key
* **Name:** `QONTEXT_VAULT_ID_SECRET` — value: your vault ID
3. Grant the agent’s service account access to these secrets:
* Go to **IAM & Admin → IAM**.
* Enable **Include Google-provided role grants** (checkbox at top right).
 * Find the Vertex AI Reasoning Engine service agent (e.g. `service-PROJECT_NUMBER@gcp-sa-aiplatform-re.iam.gserviceaccount.com`) and ensure it has:
* **Secret Manager Secret Accessor**
* **Vertex AI Reasoning Engine Service Agent**
Connect your local machine to Google Cloud first: [install and initialize the gcloud CLI](https://cloud.google.com/sdk/docs/install) if needed, then run:
1. Grant your agent’s service account access to the secrets (replace `your-agent-sa` and `your-project` with your service account and project ID):
```bash Shell theme={null}
gcloud secrets add-iam-policy-binding QONTEXT_API_KEY_SECRET \
--member="serviceAccount:your-agent-sa@your-project.iam.gserviceaccount.com" \
--role="roles/secretmanager.secretAccessor"
gcloud secrets add-iam-policy-binding QONTEXT_VAULT_ID_SECRET \
--member="serviceAccount:your-agent-sa@your-project.iam.gserviceaccount.com" \
--role="roles/secretmanager.secretAccessor"
```
2. Log in to your Google account locally:
```bash Shell theme={null}
gcloud auth login # Log in to your account
gcloud config set project YOUR_PROJECT_ID # Set project ID (Find via service account email address)
gcloud services enable secretmanager.googleapis.com # Enable Secret Manager APIs
gcloud config list # Verify changes
```
3. Create the following two secrets:
```bash Shell theme={null}
gcloud secrets create QONTEXT_API_KEY_SECRET --replication-policy="automatic"
gcloud secrets create QONTEXT_VAULT_ID_SECRET --replication-policy="automatic"
```
4. Add the secret values (replace with your real API key and vault ID):
```bash Shell theme={null}
echo -n "your-api-key" | gcloud secrets versions add QONTEXT_API_KEY_SECRET --data-file=-
echo -n "your-vault-id" | gcloud secrets versions add QONTEXT_VAULT_ID_SECRET --data-file=-
```
***
### Step 2: Set up your local development environment
Prepare your machine for ADK development and the example agent.
Run the following to create a dedicated folder for your agent and isolate dependencies in a virtual environment:
```bash Shell theme={null}
mkdir qontext_agent && cd qontext_agent
python3 -m venv .adk_env
source .adk_env/bin/activate
```
Install the Agent Development Kit, Secret Manager client, and an async HTTP client:
```bash Shell theme={null}
pip install google-adk google-cloud-secret-manager aiohttp
```
Use the example agent and requirements file from the Qontext examples repository and add a .env file:
* [**agent.py**](https://github.com/qontext-ai/examples/blob/main/examples/gemini-agent/agent.py) — main agent logic and Qontext retrieval tool
* [**requirements.txt**](https://github.com/qontext-ai/examples/blob/main/examples/gemini-agent/requirements.txt) — dependencies for local and deployed runs
* **.env**: create a .env file in the same folder and save your project ID as `GCP_PROJECT_ID`
Download or clone these into your `qontext_agent` directory. Adjust the agent (e.g. functions, model, or prompt) to match your use case.
***
### Step 3: Local testing and debugging
Test the agent on your machine with the ADK web UI before deploying.
From the parent directory of your agent folder (so ADK can find the agent module), start the web interface:
```bash Shell theme={null}
adk web
```
Open [http://127.0.0.1:8000](http://127.0.0.1:8000) in your browser. Verify that:
* The agent responds to prompts
* It uses the correct Qontext vault
* Conversational memory works across turns (ADK session state)
* If you encounter any problems, reach out to [support@qontext.ai](mailto:support@qontext.ai)
***
### Step 4: Deploy to Vertex AI Agent Engine
After local testing, deploy the agent to Google Cloud’s managed runtime.
From your project root (one level above the agent folder), run:
```bash Shell theme={null}
adk deploy agent_engine \
--project=YOUR_PROJECT_ID \
--region=YOUR_REGION \
--display_name="qontext-agent-example" \
--requirements_file=qontext_agent/requirements.txt \
--adk_app_object=root_agent \
--env_file=qontext_agent/.env \
--trace_to_cloud \
qontext_agent
```
Replace `YOUR_PROJECT_ID` and `YOUR_REGION` (e.g. `europe-west1`).
Save the URL that appears in the command output. You will need it for the agent connection in Step 5 (Google Cloud / Gemini Enterprise).
***
### Step 5: Connect and go live
Connect your deployed agent to Gemini Enterprise so you can use it in chat.
In [Gemini Enterprise](https://console.cloud.google.com/gemini-enterprise), go to your project and region, then open the **Agents** tab for your app (the same app you used in Step 4).
* Find the Vertex AI Reasoning Engine service agent (e.g. `service-PROJECT_NUMBER@gcp-sa-aiplatform-re.iam.gserviceaccount.com`) and ensure it has:
* **Secret Manager Secret Accessor**
* **Vertex AI Reasoning Engine Service Agent**
Connect your local machine to Google Cloud first: [install and initialize the gcloud CLI](https://cloud.google.com/sdk/docs/install) if needed, then run:
1. Grant your agent’s service account access to the secrets (replace `your-agent-sa` and `your-project` with your service account and project ID):
```bash Shell theme={null}
gcloud secrets add-iam-policy-binding QONTEXT_API_KEY_SECRET \
--member="serviceAccount:your-agent-sa@your-project.iam.gserviceaccount.com" \
--role="roles/secretmanager.secretAccessor"
gcloud secrets add-iam-policy-binding QONTEXT_VAULT_ID_SECRET \
--member="serviceAccount:your-agent-sa@your-project.iam.gserviceaccount.com" \
--role="roles/secretmanager.secretAccessor"
```
2. Log in to your Google account locally:
```bash Shell theme={null}
gcloud auth login # Log in to your account
gcloud config set project YOUR_PROJECT_ID # Set project ID (Find via service account email address)
gcloud services enable secretmanager.googleapis.com # Enable Secret Manager APIs
gcloud config list # Verify changes
```
3. Create the following two secrets:
```bash Shell theme={null}
gcloud secrets create QONTEXT_API_KEY_SECRET --replication-policy="automatic"
gcloud secrets create QONTEXT_VAULT_ID_SECRET --replication-policy="automatic"
```
4. Add the secret values (replace with your real API key and vault ID):
```bash Shell theme={null}
echo -n "your-api-key" | gcloud secrets versions add QONTEXT_API_KEY_SECRET --data-file=-
echo -n "your-vault-id" | gcloud secrets versions add QONTEXT_VAULT_ID_SECRET --data-file=-
```
***
### Step 2: Set up your local development environment
Prepare your machine for ADK development and the example agent.
Run the following to create a dedicated folder for your agent and isolate dependencies in a virtual environment:
```bash Shell theme={null}
mkdir qontext_agent && cd qontext_agent
python3 -m venv .adk_env
source .adk_env/bin/activate
```
Install the Agent Development Kit, Secret Manager client, and an async HTTP client:
```bash Shell theme={null}
pip install google-adk google-cloud-secret-manager aiohttp
```
Use the example agent and requirements file from the Qontext examples repository and add a .env file:
* [**agent.py**](https://github.com/qontext-ai/examples/blob/main/examples/gemini-agent/agent.py) — main agent logic and Qontext retrieval tool
* [**requirements.txt**](https://github.com/qontext-ai/examples/blob/main/examples/gemini-agent/requirements.txt) — dependencies for local and deployed runs
* **.env**: create a .env file in the same folder and save your project ID as `GCP_PROJECT_ID`
Download or clone these into your `qontext_agent` directory. Adjust the agent (e.g. functions, model, or prompt) to match your use case.
***
### Step 3: Local testing and debugging
Test the agent on your machine with the ADK web UI before deploying.
From the parent directory of your agent folder (so ADK can find the agent module), start the web interface:
```bash Shell theme={null}
adk web
```
Open [http://127.0.0.1:8000](http://127.0.0.1:8000) in your browser. Verify that:
* The agent responds to prompts
* It uses the correct Qontext vault
* Conversational memory works across turns (ADK session state)
* If you encounter any problems, reach out to [support@qontext.ai](mailto:support@qontext.ai)
***
### Step 4: Deploy to Vertex AI Agent Engine
After local testing, deploy the agent to Google Cloud’s managed runtime.
From your project root (one level above the agent folder), run:
```bash Shell theme={null}
adk deploy agent_engine \
--project=YOUR_PROJECT_ID \
--region=YOUR_REGION \
--display_name="qontext-agent-example" \
--requirements_file=qontext_agent/requirements.txt \
--adk_app_object=root_agent \
--env_file=qontext_agent/.env \
--trace_to_cloud \
qontext_agent
```
Replace `YOUR_PROJECT_ID` and `YOUR_REGION` (e.g. `europe-west1`).
Save the URL that appears in the command output. You will need it for the agent connection in Step 5 (Google Cloud / Gemini Enterprise).
***
### Step 5: Connect and go live
Connect your deployed agent to Gemini Enterprise so you can use it in chat.
In [Gemini Enterprise](https://console.cloud.google.com/gemini-enterprise), go to your project and region, then open the **Agents** tab for your app (the same app you used in Step 4).
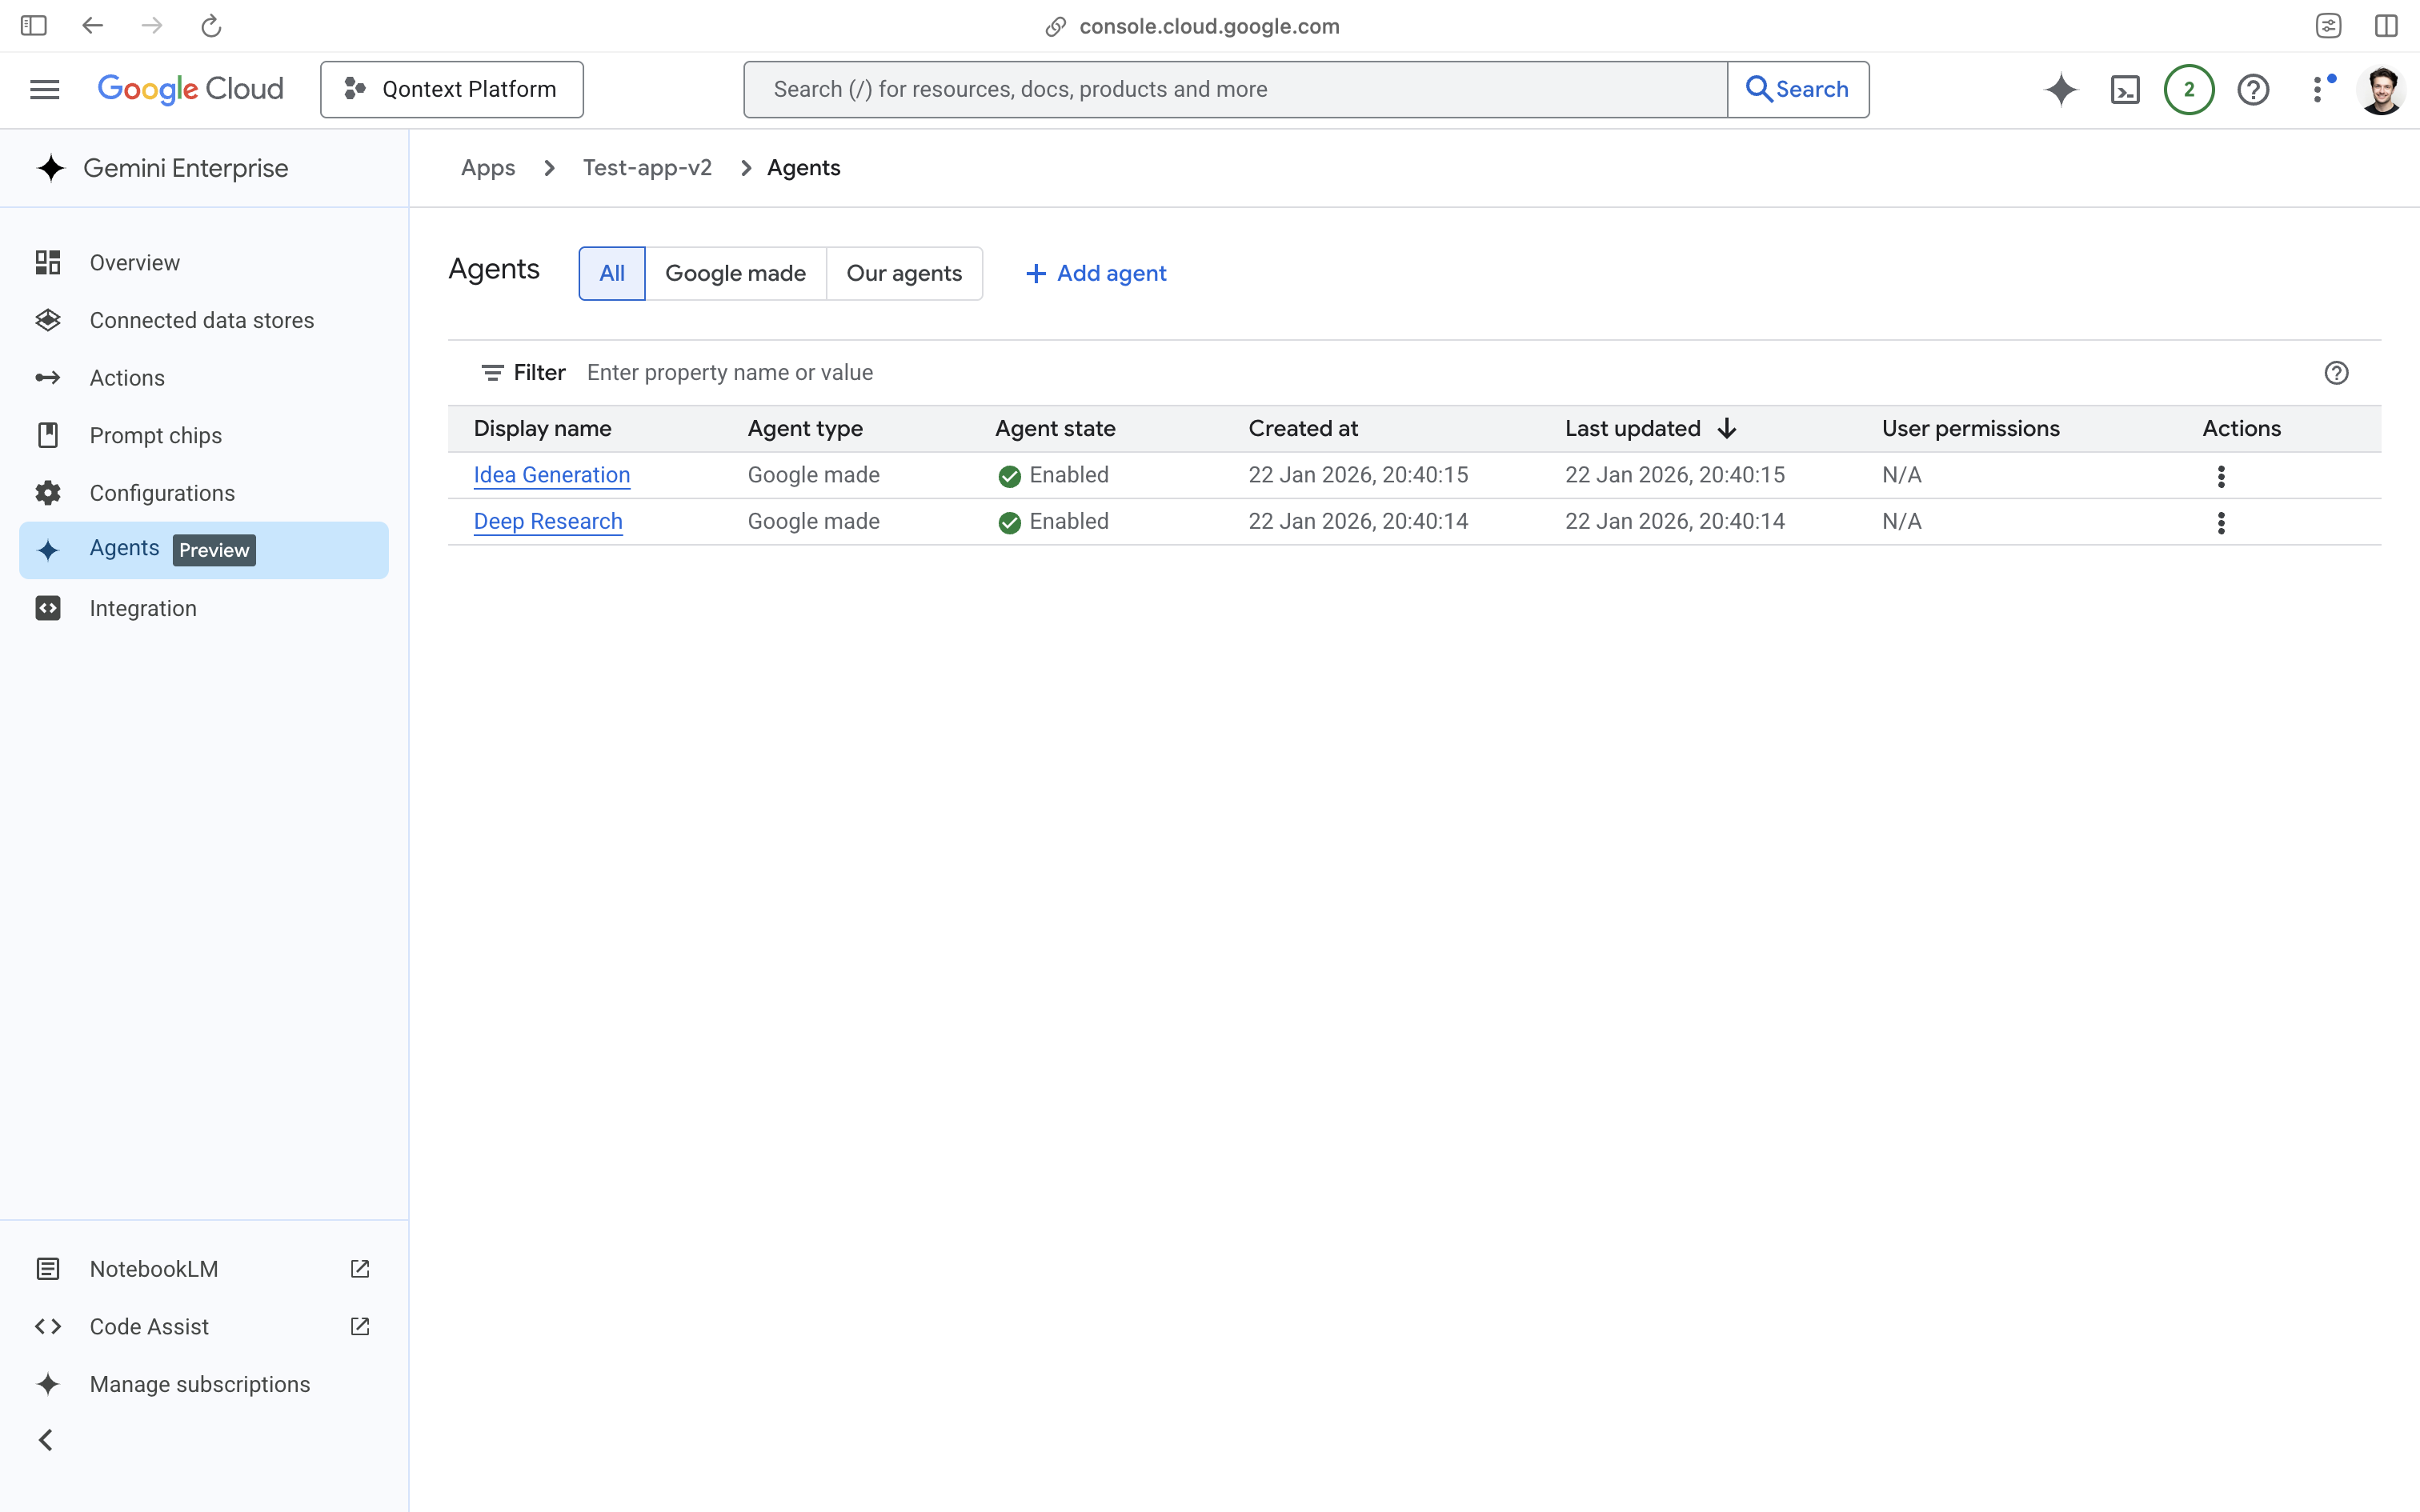 Click on **Add agent** and choose **Custom agent via Agent Engine**.
On the Authorizations step, click **Next** to skip.
Give the agent a meaningful **name** and **description**. In the URL field, enter the **Agent Engine reasoning engine URL** that the CLI returned after Step 4 (when you ran `adk deploy agent_engine`).
Click on **Add agent** and choose **Custom agent via Agent Engine**.
On the Authorizations step, click **Next** to skip.
Give the agent a meaningful **name** and **description**. In the URL field, enter the **Agent Engine reasoning engine URL** that the CLI returned after Step 4 (when you ran `adk deploy agent_engine`).
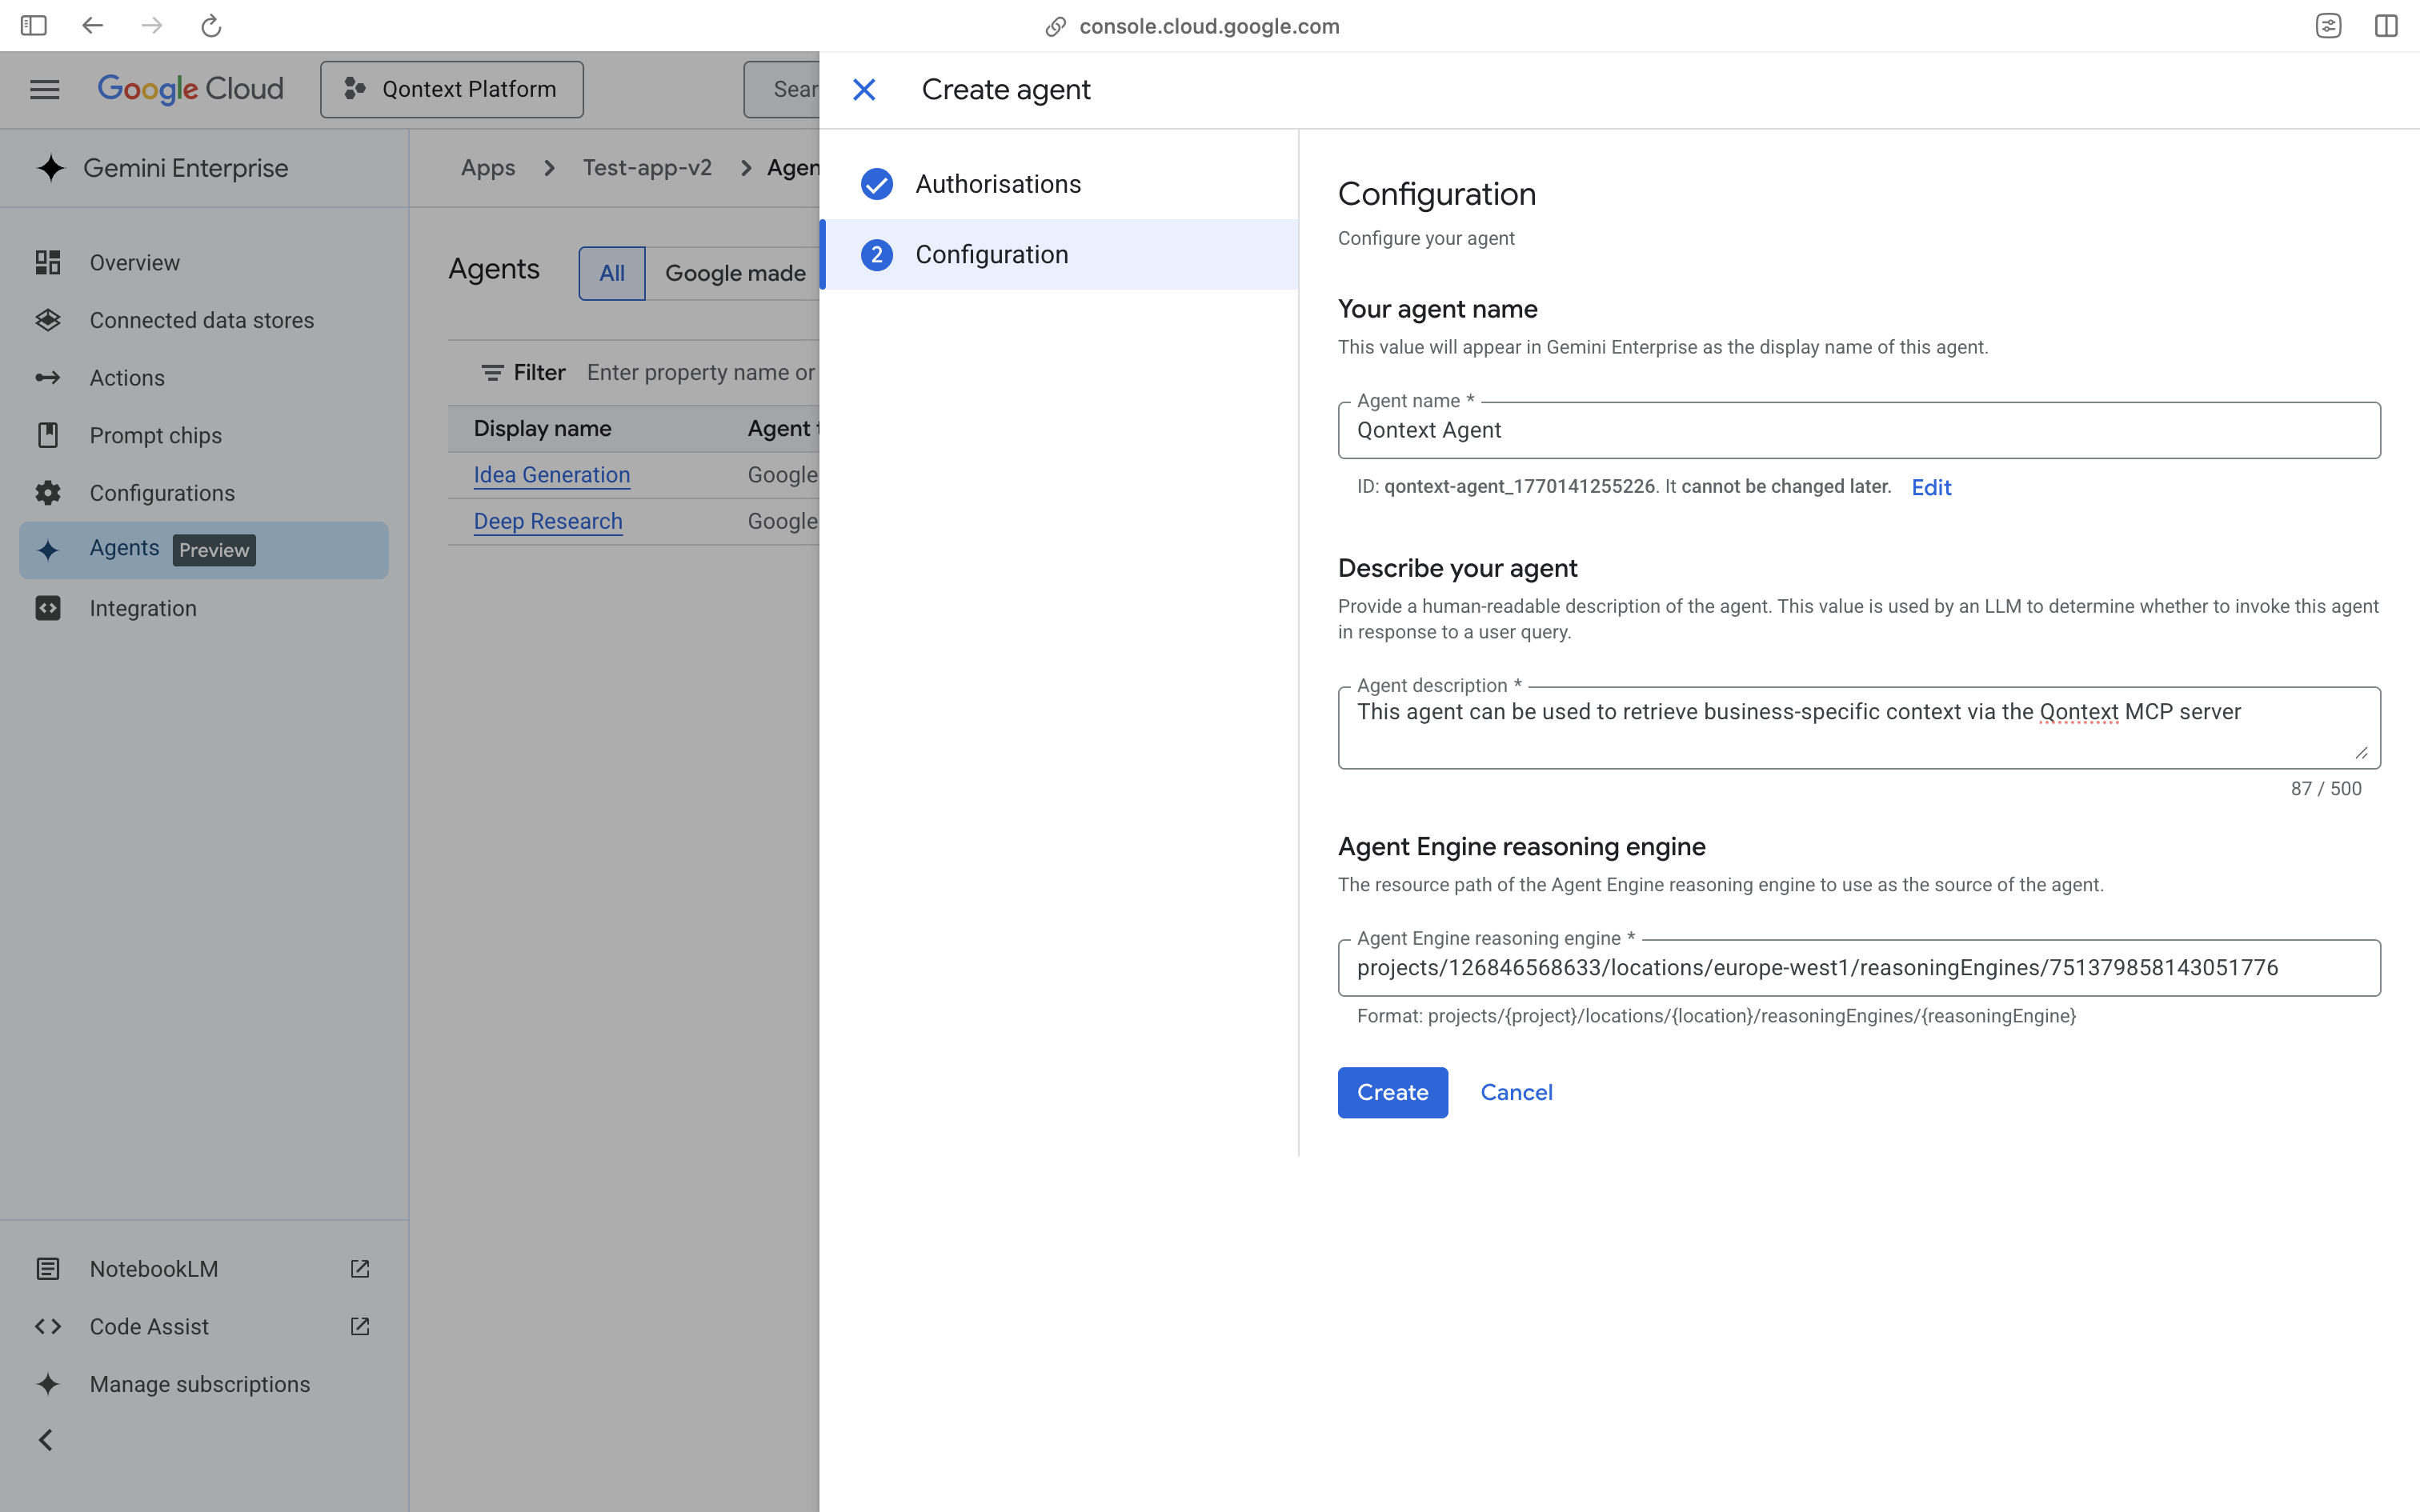 Click **Create**. Your agent is then available in Gemini Enterprise. You can use it in chat by typing **@** and selecting your agent name (e.g. `@YourAgentName`).
***
Need Help? If you encounter issues with the Gemini integration, reach out to [support@qontext.ai](mailto:support@qontext.ai).
Also, check the [Vertex AI Agent Development Kit docs](https://docs.cloud.google.com/agent-builder/agent-engine/develop/adk) for more deployment and configuration options.
Click **Create**. Your agent is then available in Gemini Enterprise. You can use it in chat by typing **@** and selecting your agent name (e.g. `@YourAgentName`).
***
Need Help? If you encounter issues with the Gemini integration, reach out to [support@qontext.ai](mailto:support@qontext.ai).
Also, check the [Vertex AI Agent Development Kit docs](https://docs.cloud.google.com/agent-builder/agent-engine/develop/adk) for more deployment and configuration options.